Deck Repainting Done Right: Why Prep Matters Most
When it comes to deck repainting, the prep work you do before opening a single can of paint makes all the difference. If you’re wondering how to prep a deck for painting, know it’s more than just removing visible dirt. You are looking for the proper foundation for the paint to bond, protect, and last.
Without proper surface preparation, even the best deck paint will fail prematurely. Skipping prep leads to problems like cracking, peeling, bubbling, and uneven color; all signs that the paint never fully adhered to the wood beneath it. And once the elements get underneath the coating, it’s only a matter of time before moisture and UV rays begin to break things down.
Proper prep matters so much for several reasons:
- It helps paint stick properly: Unwashed or unsanded wood prevents paint from bonding to the surface, making it more likely to chip and peel.
- It reveals hidden damage before you paint: Prepping your deck—especially steps like sanding and cleaning—lets you spot soft wood, loose nails, or rot that could otherwise be sealed under paint and missed entirely. Catching these issues early prevents painting over structural problems that will only get worse over time
- It extends the life of the finish: Paint applied to a clean, sanded, and primed surface lasts significantly longer than paint applied over grime, mildew, or moisture.
- It keeps your warranty intact. Many professional painting warranties require evidence of proper prep, including cleaning, sanding, and priming. If you skip those steps, don’t expect the guarantee to hold up if the paint fails.
And let’s not forget the visual payoff. Decks that are prepped correctly look better, feel smoother, and maintain color vibrancy over time. There’s a noticeable difference between a rushed weekend job and one that was set up for success from the start.
So if you want your next deck repainting project to actually last, start by learning how to prep a deck for painting—or call in the pros who already know how. Your future self (and your deck boards) will thank you.
Step-by-Step: What Deck Painters Must Know
For professional deck painters, the quality of the final result comes down to what happens before the first coat of paint ever touches wood. If you’re a homeowner trying to figure out how to prep a deck for painting, this is where the work really begins.
The preparation process not only determines how good the deck looks, but it also affects how long it lasts. Whether you’re doing a deck repainting job or painting for the first time, some steps are non-negotiable.
Here’s a detailed, pro-grade checklist every painter (and homeowner) should follow:
1. Select the right coating
Before you start prepping, you need to know what you’re working with. Will you use paint or stain? This choice will influence every step that follows. For older or damaged decks, a solid deck paint offers better coverage and protection, while stain works well for newer wood and highlights the natural grain.
Climate also plays a big role: humid areas benefit from waterproof coatings, while dry zones may allow more flexibility in appearance. Picking the wrong product can lead to premature failure or ongoing maintenance headaches.
Consider the material of your deck—composite versus wood—as well as the amount of foot traffic it receives. If you’re unsure what to choose, a professional can help you match product to surface. Ultimately, starting with the right coating means you’ll get longer wear, better color retention, and fewer surprises down the road.
2. Clear the deck completely
Before you can clean or prep anything, the deck needs to be totally cleared. That means removing all outdoor furniture, potted plants, rugs, grills, lighting, and decorative objects. Leaving anything behind may result in missed spots or uneven application later. It’s also essential for safety. You don’t want to trip over a planter while using a power washer or sander.
Deck painters know that the best results come from a blank canvas. According to cleaning experts, even “hidden spots” can harbor grime, so clearing everything ensures you don’t miss areas that could affect adhesion.
3. Sweep the surface thoroughly
Once cleared, it’s time to give your deck a good sweep. This simple step can be easily overlooked, but it is crucial to the process. Use a stiff broom or leaf blower to remove loose debris like twigs, leaves, pollen, and dust. If left behind, this debris can trap moisture and create a gritty surface that ruins your paint job.
This is also a good moment to inspect the surface more closely. Look for mold, algae, or areas that might need deeper attention. A clean sweep ensures you’re not grinding dirt deeper into the wood when sanding or washing, and it prevents the buildup of grime that can interfere with your cleaning solution.
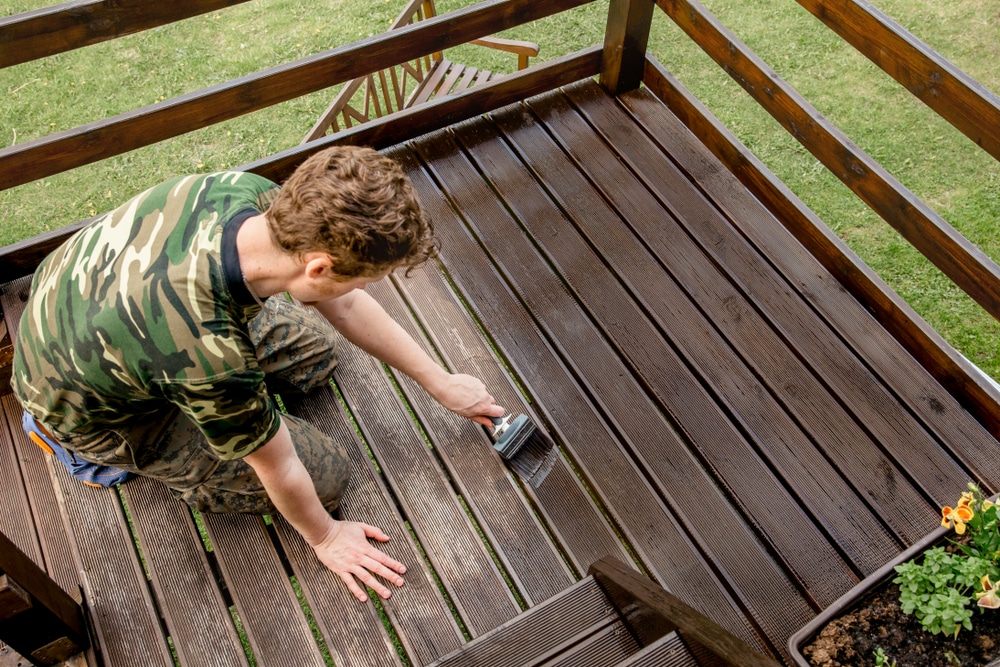
4. Strip old paint or stain (if necessary)
If you’re tackling a deck repainting project and notice areas where the previous coating is flaking, bubbling, or uneven, those spots must be stripped. Painting over failing finishes is a recipe for disaster: your new paint won’t bond properly and will peel right off. Use a deck stripper or chemical remover, and follow the manufacturer’s instructions carefully.
Even if only part of the deck is peeling, you’ll need to feather out those areas by removing the loose material and blending edges. A smooth, uniform surface will ensure your new coating adheres consistently and looks polished, not patchy.
5. Deep clean the deck
This step answers the question: how do you clean a deck before painting? After stripping, deep cleaning ensures all contaminants are gone. Use a commercial deck cleaner or a DIY solution of water and white vinegar (plus baking soda on stains), applied with a pump sprayer. Scrub with a stiff-bristle brush and rinse with a hose or pressure washer on low power, keeping the nozzle 6 inches from the surface.
Make sure the deck is fully dry before proceeding, ideally 24 to 48 hours of warm, dry weather. Moisture trapped in wood can sabotage paint adhesion and lead to blistering or mildew down the line. Whether you’re painting a wood or composite deck, always use the right cleaner and brush type for your surface material.
6. Sand the surface
We often hear the question: Do you need to sand a deck before painting? Yes, and not just in spots. Sanding evens out the wood, removes leftover finish, and opens up the grain to accept new paint or stain. Focus on rough patches, splinters, and previously coated areas that still show residue. Use a pole sander for large sections and detail sanders for railings and edges.
Be sure to sand with the grain to prevent damage and wear protective gear. If you skip this step, the paint will sit on top of the wood, leading to chipping, peeling, and water intrusion. Deck painters never skip sanding—it’s what gives that professional, long-lasting look.
7. Repair any damage
Deck prep isn’t just about aesthetics; it’s also about structural safety. Take this time to inspect the surface for damage. Are there rotting planks, lifted nails, warped boards, or loose railings? Replace or re-secure where needed. Use wood filler for minor cracks and gaps, and let it cure fully before sanding again.
Skipping repairs can compromise the entire paint job. Even the best products can’t fix a failing substrate. Fixing issues now saves money later and ensures your deck remains safe, solid, and beautiful for years to come.
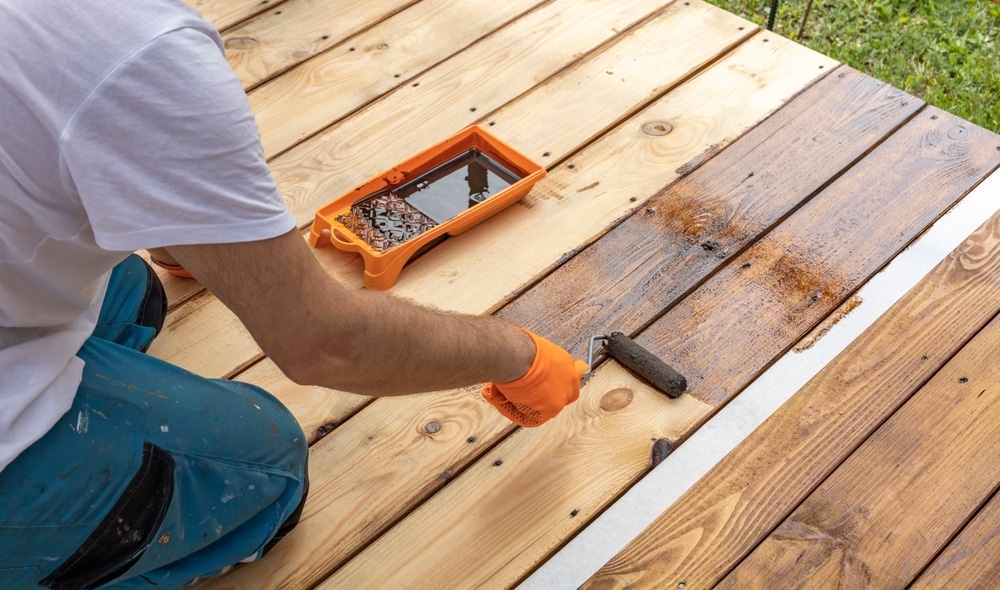
8. Prime the deck (if painting)
Priming is essential if you’re using paint—not stain—especially over bare or repaired wood. It seals the surface, blocks stains and knots, and creates a uniform base that helps the paint go on smoothly and last longer. Always choose a primer suited for outdoor wood surfaces and apply evenly with a roller or sprayer.
While some paints are labeled “paint + primer,” seasoned deck painters know a dedicated primer coat gives the best results. Think of it as the glue between your hard prep work and your final finish.
Quick Recap: The Must-Know Prep Steps for Deck Painters
- Choose the right product: paint vs. stain
- Clear the deck of all furniture and decor
- Sweep thoroughly
- Strip old coatings where needed
- Clean the deck with solution + rinse + dry
- Sand completely, always with the grain
- Repair all damage before moving on
- Prime for optimal performance
Following this process ensures your deck surface is smooth, dry, clean, and ready, exactly what a high-performance coating needs to last. Proper prep is performance, so if you’re serious about doing the job right, take your time on the prep. Or you can always call in professional deck painters who know these steps inside and out, and forget it.
Insider Tips for a Better Deck Finish
Here are five insider pro tips to help deck painters achieve a smooth, long-lasting finish—each backed by advice from trusted industry sources:
I. Let the wood dry thoroughly
For deck repainting success, especially on pressure-treated wood, dryness is critical. Fresh lumber can hold too much moisture for proper adhesion. A reliable test? Drop some water. If it beads, wait longer; if it soaks in, you’re good to go. Professionals recommend a moisture content of 12–15% or less before painting to prevent bubbling and peeling down the road.
II. Use a deck cleaner & gentle power wash
Effective prep includes how to clean a deck before painting thoroughly. Start with a specialized deck cleaner and scrub with a stiff brush. Use low-pressure washing to rinse off old coatings, mildew, and grime, bringing out the natural grain without damaging the wood. This crucial step helps paint stick better and look more even.
III. Prime with a quality exterior primer
Skimping on primer is a rookie mistake. Deck paint requires a strong, uniform base, so coat the deck with a durable exterior primer, especially over bare wood or areas with repairs. This ensures paint adheres correctly, prevents peeling, and extends the life of your finish.
IV. Apply thin, even coats and let each dry
Less is more. Apply multiple thin coats instead of one thick layer. This method ensures even coverage, quicker drying, and a smoother final texture. After each coat, lightly sand and clean before applying the next. Follow label directions for curing times—usually 4–6 hours between coats—to get a professional-grade result.
V. Paint in ideal weather conditions
Avoid painting on hot, humid, or rainy days. The ideal window is mild temperatures (around 50–85 °F), low humidity, and dry weather. This gives the paint time to penetrate and bond properly. Improper timing can cause bubbling, uneven curing, or trapped moisture issues later.
These pro-level techniques—dry wood, careful cleaning, priming, thin layers, and smart timing—make the difference between a deck that looks good once and one that looks great for years. When you’re ready, let’s move on to Common Mistakes to Avoid.
These pro-level techniques—dry wood, careful cleaning, priming, thin layers, and smart timing—make the difference between a deck that looks good once and one that looks great for years.
What Not to Do Before Painting Your Deck
Even the most motivated DIYers can fall into traps when repainting a deck. Whether you’re figuring out how to prep a deck for painting or already rolling on that first coat, here are five of the most common missteps and how to avoid them.
- Skipping the supply checklist: Deck repainting isn’t just about a bucket of paint and a brush. Missing key tools like deck strippers, scrapers, or extension rollers can delay your project or lead to a poor-quality finish. Be sure to gather everything beforehand, including cleaning products, sanding tools, and safety gear.
- Choosing the wrong finish: If your deck is older or weathered, a transparent stain may no longer cut it. Using a solid stain or paint helps conceal damage and offers better protection for aging wood. Choosing the wrong type of coating is one of the top reasons for premature failure.
- Overlooking color harmony: It’s tempting to pick a trendy shade, but mismatched colors can clash with your home’s aesthetic. Take time to select a paint color that complements both your personal style and the exterior of your house. A cohesive color palette elevates curb appeal and avoids costly regrets.
- Overestimating your skill level: Deck painting requires more than patience; it sometimes demands repairs, precision cutting, or advanced prep techniques. If you’re unsure about replacing boards or tackling extensive sanding, consider calling in a professional or at least getting help from someone with experience.
- Underestimating the time commitment: Deck repainting is not a one-and-done afternoon project. Between stripping, cleaning, sanding, painting, and drying between coats, it can easily stretch into a multi-day affair. Failing to schedule enough time often results in rushed work and patchy results. Plan ahead and block out the time it deserves.
Avoiding these common mistakes doesn’t just save time: it helps ensure your deck looks beautiful and lasts longer. Next up: the tools that make all the difference, and when it’s time to call in the pros.
DIY Deck Prep? Read This First
Thinking of taking on deck repainting yourself? Great. Just know that there are certain tools and supplies that can make the job quicker, easier, and more durable. These items require a little skill or investment, but for serious deck prep, they’re worth considering:
- Pressure washer: This is the fastest way to remove grime, old coatings, and mildew. But be careful because too much pressure can gouge wood. Use a 25° (green) or 40° (white) nozzle, keeping the wand ~12–18” from the deck, and move in sweeping arcs along the grain to avoid damage.
- Deck cleaner and acid brightener: Professionally recommended before staining or painting. The cleaner lifts dirt and organic growth; the brightener neutralizes residues and restores pH, readying wood for an even, long-lasting finish.
- Orbital or pole sander: Removes remaining finish, smooths the surface, and opens the wood grain. Overall, avoid skipping sanding, deck painters always sand to ensure paint or stain bonds properly.
- Moisture meter: This helps answer the questions “Do you need to sand a deck before painting?” and “How to prep a deck for painting.” But really, it ensures your wood is dry enough for paint. A moisture reading below 15% means the deck is ready for coating.
- Wood filler, caulk and scraper: Essential for repairing cracks, holes, and damaged boards—prep that creates a flat, sealed surface before paint. Plus, scrapers help remove loose old coatings more effectively.
These tools are really important because:
- Pressure washing and deck cleaners remove layers of dirt, mildew, and old coatings for better adhesion.
- Sanders and moisture meters confirm the wood’s ready for painting—dry and smooth.
- Wood filler and scrapers handle imperfections that would be glaring once painted.
They will not only help you follow how to prep a deck for painting properly; they’re what separates a basic DIY job from pro-level results. If this sounds overwhelming (or you just prefer to skip the gear and grit), it might be time to call professional deck painters who already own them and know how to use them right.
Could you do this yourself? Sure… (we think). But why would you?
Deck preparation is time-consuming, physically demanding, and—most of all—unforgiving. One missed step, and your paint could peel within weeks. And let’s face it: sanding for hours, pressure washing evenly, testing moisture levels… it’s a lot. Even if you follow every instruction for how to prep a deck for painting, you’re still juggling rentals, supplies, and a high risk of error.
Koehn Painting saves you the trip to the rental shop, the sore back, and the costly do-over. Our expert deck painters show up with the right tools, the right techniques, and the experience to get it done right, the first time.
How to Prep a Deck for Painting and When to Call the Pros
By now, it’s clear: knowing how to prep a deck for painting is the difference between a finish that lasts and one that flakes by fall. Cleaning, sanding, drying, and repairing, each step builds the foundation for paint that adheres evenly and stands up to weather, wear, and time.
Proper prep protects your investment. It highlights structural issues, extends the life of your finish, and ensures your paint performs as promised. But here’s the truth: doing it right is hard, and redoing it costs more.
Save yourself the time, stress, and second-guessing. Let our team deliver a result that looks great and lasts longer than a single season.


")

")